Bluetooth Notes
Must Watch!
MustWatch
To detect Bluetooth and Bluetooth Low Energy (BLE) devices
Methods depend on the platform or programming language you are using.
Here are a few common approaches:
Mobile Applications:
Android:
On Android, you can use the Android Bluetooth API, specifically the BluetoothAdapter class, to detect Bluetooth devices.
You can scan for Bluetooth devices and filter them based on their Bluetooth profiles, such as Classic Bluetooth or BLE.
Here is an example of using the Android Bluetooth API to discover devices:
https://developer.android.com/guide/topics/connectivity/bluetooth/discovering-devices
iOS:
On iOS, you can use the CoreBluetooth framework to scan for Bluetooth devices.
You can filter devices based on their services and characteristics to identify BLE devices.
Here is an example of using CoreBluetooth:
https://developer.apple.com/documentation/corebluetooth/scanning_for_peripherals_and_services
Desktop Applications:
Windows:
On Windows, you can use the Windows.Devices.Bluetooth namespace in the Universal Windows Platform (UWP) API to discover Bluetooth devices.
You can check the BluetoothClass property of the devices to identify Classic Bluetooth devices, and the Advertisement property to identify BLE devices.
Here is an example of scanning for Bluetooth devices in UWP:
https://docs.microsoft.com/en-us/windows/uwp/devices-sensors/discover-and-pair-bluetooth-devices
macOS:
On macOS, you can use the CoreBluetooth framework, similar to iOS, to scan for BLE devices.
Here is an example of using CoreBluetooth in macOS:
https://developer.apple.com/documentation/corebluetooth/scanning_for_peripherals_and_services
Web Applications:
Web Bluetooth API:
In a web application, you can use the Web Bluetooth API (currently supported in Chrome and Opera) to scan for and connect to Bluetooth devices.
The API provides methods to discover devices and filter them based on their GATT services.
Here is an example of using the Web Bluetooth API:
https://developers.google.com/web/updates/2015/07/interact-with-ble-devices-on-the-web
These are just a few examples of how you can detect Bluetooth and BLE devices on different platforms.
The specific implementation details may vary based on the programming language or framework you are using.
To use the Universal Windows Platform (UWP) API to identify Bluetooth devices
and switch to the proper method to communicate:
Enable Bluetooth capabilities: In your UWP application, make sure you have enabled the necessary capabilities to access Bluetooth.
Open the Package.appxmanifest file and go to the Capabilities tab.
Enable the "Bluetooth" and "Bluetooth.GenericAttributeProfile" capabilities.
Scan for BLE devices: Use the BluetoothLEAdvertisementWatcher class to scan for BLE devices.
Here's an example of how to scan for BLE devices:
csharp
using Windows.Devices.Bluetooth;
using Windows.Devices.Bluetooth.Advertisement;
// Create the BluetoothLEAdvertisementWatcher instance
BluetoothLEAdvertisementWatcher watcher = new BluetoothLEAdvertisementWatcher();
// Configure the watcher for BLE devices
watcher.ScanningMode = BluetoothLEScanningMode.Active;
// Event handler for when a BLE device is found
watcher.Received += (sender, args) =>
{
// Get the Bluetooth device information
BluetoothLEAdvertisementReceivedEventArgs eventArgs = args;
BluetoothLEDevice device = await BluetoothLEDevice.FromBluetoothAddressAsync(eventArgs.BluetoothAddress);
// Check if the device is a BLE device
if (device != null && device.DeviceInformation.BluetoothClass.MajorClass == BluetoothMajorClass.Peripheral)
{
// Handle the BLE device
// You can switch to the proper method to communicate with the device based on your application's logic
}
};
// Start scanning for BLE devices
watcher.Start();
Communicate with the BLE device: Once you have identified a BLE device, you can switch to the appropriate method to communicate with the device.
The method of communication depends on your specific requirements and the functionality of the BLE device.
You can use the BluetoothLEDevice class to establish a connection with the BLE device and use the GattDeviceService and GattCharacteristic classes to interact with the device's services and characteristics.
Refer to the official Microsoft documentation for more information on communication with BLE devices using UWP API: https://docs.microsoft.com/en-us/windows/uwp/devices-sensors/gatt-client
This example demonstrates the basic steps to identify BLE devices and switch to the proper method to communicate using the UWP API in a Windows application.
Remember to handle errors and implement the necessary error checking and exception handling in your code for a robust application.
to use Python, JavaScript, or R to handle Bluetooth Low Energy (BLE) devices
the specific APIs and libraries available may vary based on the platform and programming language.
Here's a brief overview of how you can handle BLE devices using these languages:
Python:
PyBluez: PyBluez is a Python library that provides Bluetooth functionality.
It includes support for Bluetooth sockets and scanning for BLE devices.
You can use the bleak library, which is built on top of PyBluez, to interact with BLE devices.
Here's an example of using bleak to scan for BLE devices: https://github.com/hbldh/bleak/blob/main/examples/scan.py
PyGatt: PyGatt is another Python library that allows communication with BLE devices.
It provides an API to discover services, characteristics, and perform read/write operations.
Here's an example of using PyGatt to communicate with a BLE device: https://github.com/peplin/pygatt/blob/develop/examples/discover_characteristics.py
JavaScript:
Web Bluetooth API: JavaScript can be used in web applications with the Web Bluetooth API, which provides a standard way to communicate with BLE devices.
It allows scanning for and connecting to BLE devices directly from the web browser.
Here's an example of scanning for BLE devices using the Web Bluetooth API: https://googlechrome.github.io/samples/web-bluetooth/scan.html
R:
RBluetooth: RBluetooth is an R package that provides Bluetooth functionality.
It allows scanning for nearby Bluetooth devices, including BLE devices.
However, it's important to note that RBluetooth may have limited support for BLE compared to other languages.
Here's an example of using RBluetooth to scan for Bluetooth devices: https://cran.r-project.org/web/packages/RBluetooth/vignettes/scan.html
Keep in mind that the availability and functionality of Bluetooth libraries and APIs may differ across platforms and programming languages.
It's recommended to refer to the respective documentation and resources for each library or API to understand their capabilities and usage in more detail.
example of using the RBluetooth package in R
to scan for nearby Bluetooth devices, including BLE devices:
# Install and load the RBluetooth package
install.packages("RBluetooth")
library(RBluetooth)
# Scan for nearby Bluetooth devices
devices <- bt_discover()
# Filter for BLE devices
ble_devices <- devices[devices$device_type == "ble", ]
# Print the discovered BLE devices
print(ble_devices)
In this code snippet, we first install and load the RBluetooth package using install.packages() and library().
Then, we use the bt_discover() function to scan for nearby Bluetooth devices.
The function returns a data frame with information about each discovered device, including the device type.
We filter the devices to only include BLE devices by selecting the rows where the device_type column is "ble".
Finally, we print the discovered BLE devices.
Please note that the functionality and compatibility of the RBluetooth package may depend on the underlying system and hardware.
A version of this package for your version of R might be available elsewhere, see the ideas at
https://cran.r-project.org/doc/manuals/r-patched/R-admin.html#Installing-packages
Web Bluetooth / Scanning Sample
The Web Bluetooth API lets websites discover and communicate with devices over the Bluetooth 4 wireless standard using the Generic Attribute Profile (GATT).
It is currently partially implemented in Android M, Chrome OS, Mac, and Windows 10.
This sample illustrates basic use of the Web Bluetooth Scanning API to report advertising packets from nearby Bluetooth Low Energy Devices.
Note: Scanning is still under development.
You must be using Chrome 79+ with the chrome://flags/#enable-experimental-web-platform-features flag enabled.
JavaScript Snippet
async function onButtonClick() {
let filters = [];
let filterName = document.querySelector('#name').value;
if (filterName) {
filters.push({name: filterName});
}
let filterNamePrefix = document.querySelector('#namePrefix').value;
if (filterNamePrefix) {
filters.push({namePrefix: filterNamePrefix});
}
let options = {};
if (document.querySelector('#allAdvertisements').checked) {
options.acceptAllAdvertisements = true;
} else {
options.filters = filters;
}
try {
log('Requesting Bluetooth Scan with options: ' + JSON.stringify(options));
const scan = await navigator.bluetooth.requestLEScan(options);
log('Scan started with:');
log(' acceptAllAdvertisements: ' + scan.acceptAllAdvertisements);
log(' active: ' + scan.active);
log(' keepRepeatedDevices: ' + scan.keepRepeatedDevices);
log(' filters: ' + JSON.stringify(scan.filters));
navigator.bluetooth.addEventListener('advertisementreceived', event => {
log('Advertisement received.');
log(' Device Name: ' + event.device.name);
log(' Device ID: ' + event.device.id);
log(' RSSI: ' + event.rssi);
log(' TX Power: ' + event.txPower);
log(' UUIDs: ' + event.uuids);
event.manufacturerData.forEach((valueDataView, key) => {
logDataView('Manufacturer', key, valueDataView);
});
event.serviceData.forEach((valueDataView, key) => {
logDataView('Service', key, valueDataView);
});
});
setTimeout(stopScan, 10000);
function stopScan() {
log('Stopping scan...');
scan.stop();
log('Stopped.
scan.active = ' + scan.active);
}
} catch(error) {
log('Argh! ' + error);
}
}
/* Utils */
const logDataView = (labelOfDataSource, key, valueDataView) => {
const hexString = [...new Uint8Array(valueDataView.buffer)].map(b => {
return b.toString(16).padStart(2, '0');
}).join(' ');
const textDecoder = new TextDecoder('ascii');
const asciiString = textDecoder.decode(valueDataView.buffer);
log(` ${labelOfDataSource} Data: ` + key +
'\n (Hex) ' + hexString +
'\n (ASCII) ' + asciiString);
};
example of using PyBluez for Bluetooth
import bluetooth
# Enable Bluetooth discovery mode
bluetooth.enable_discoverable()
# Discover nearby Bluetooth devices
devices = bluetooth.discover_devices(duration=10, lookup_names=True)
# Filter for BLE devices
ble_devices = [dev for dev in devices if bluetooth.lookup_service(dev)[0] == bluetooth.L2CAP]
# Print the discovered BLE devices
for addr, name in ble_devices:
print(f"Device Name: {name}")
print(f"Device MAC Address: {addr}")
print("------------------------")
In this code snippet, we start by enabling Bluetooth discovery mode using bluetooth.enable_discoverable().
Then, we use the bluetooth.discover_devices() function to scan for nearby Bluetooth devices.
We set the duration parameter to specify the scanning duration in seconds.
The function returns a list of discovered devices, and we use the lookup_service() function to determine the device type.
BLE devices typically use the L2CAP protocol, so we filter the devices based on the service type.
Finally, we print the information for each discovered BLE device, including the device name and MAC address.
Please make sure you have installed the PyBluez library using pip install pybluez before running this code.
use MicroPython to scan for Bluetooth devices
The availability of Bluetooth support in MicroPython may depend on the specific MicroPython variant you are using and the hardware platform it is running on.
If your MicroPython variant and hardware platform have Bluetooth support, you can follow these general steps to scan for Bluetooth devices:
Import the necessary modules:
import bluetooth
Enable Bluetooth discovery mode:
bluetooth.enable()
Discover nearby Bluetooth devices:
devices = bluetooth.discover_devices(lookup_names=True)
Filter for BLE devices:
ble_devices = [dev for dev in devices if bluetooth.get_device_info(dev)[2] == 'LE']
Print the discovered BLE devices:
for addr, name in ble_devices:
print("Device Name:", name)
print("Device MAC Address:", addr)
print("------------------------")
ESP32 Bluetooth Getting started
ESP32 has on-chip Bluetooth and BLE (Bluetooth Low Energy).
In this guide, we will see the Bluetooth part.
ESP32 Bluetooth is also referred as classic Bluetooth.
Using Bluetooth is very much simple on ESP32 with BluetoothSerial Library with Arduino IDE.
To start with, open the example in Arduino IDE File > Examples > BluetoothSerial > SerialtoSerialBT.
//This example code is in the Public Domain (or CC0 licensed, at your option.)
//By Evandro Copercini - 2018
//
//This example creates a bridge between Serial and Classical Bluetooth (SPP)
//and also demonstrate that SerialBT have the same functionalities of a normal Serial
#include "BluetoothSerial.h"
#if !defined(CONFIG_BT_ENABLED) || !defined(CONFIG_BLUEDROID_ENABLED)
#error Bluetooth is not enabled! Please run `make menuconfig` to and enable it
#endif
BluetoothSerial SerialBT;
void setup() {
Serial.begin(115200);
SerialBT.begin("ESP32test"); //Bluetooth device name
Serial.println("The device started, now you can pair it with bluetooth!");
}
void loop() {
if (Serial.available()) {
SerialBT.write(Serial.read());
}
if (SerialBT.available()) {
Serial.write(SerialBT.read());
}
delay(20);
}
How this code works
The code starts with
#include "BluetoothSerial.h"
The next three lines check if Bluetooth is properly enabled.
#if !defined(CONFIG_BT_ENABLED) || !defined(CONFIG_BLUEDROID_ENABLED)
#error Bluetooth is not enabled! Please run `make menuconfig` to and enable it
#endif
Now, we have to define the object of the class BluetoothSerial.
This object will be used for initializing the Bluetooth Stack on ESP32.
Defining the Object:
BluetoothSerial SerialBT;
setup()
In the setup initialize serial communication at a baud rate of 115200.
Next, we call the begin function of the BluetoothSerial object.
This will initialize the Bluetooth Serial.
As an input to this function, we pass the name which we want to assign to the Bluetooth.
Here is “ESP32test”.
SerialBT.begin("ESP32test"); //Bluetooth device name
loop()
In the loop, we send and receive the data via Bluetooth Serial.
First if statement: we check if bytes are being received in the serial port.
In this example, we will send the data from Computer to ESP32 on Serial Communication.
If this data is available, then send that information via Bluetooth to the connected device.
i.e., Smartphone.
if (Serial.available()) {
SerialBT.write(Serial.read());
}
SerialBT.write() sends data using Bluetooth serial to the connected device.
Serial.read() returns the data received in the serial port.
The next if statement, checks if there are bytes available to read in the Bluetooth Serial port.
If there are, we’ll write those bytes in the Serial Monitor on the computer.
if (SerialBT.available()) {
Serial.write(SerialBT.read());
}
Testing on ESP32
First, we need Android Smartphone, where we have to download app on Google Play Store for Bluetooth serial Terminal.
There are multiple apps available.
You can download any.
I will suggest the following, “Bluetooth Terminal” it’s light and simple.
Install it.
Now Upload the code in Your ESP32 Board.
The code will start executing and Turns ON the ESP32 Bluetooth Stack.
Now go to your Android Phone Bluetooth Setting >> search for new device
You will find the Device with the name “ESP32test”.
Click on it and add it to the pair device.
After successfully paring, Open the “Bluetooth Terminal” Application, and connect to the “ESP32test”.
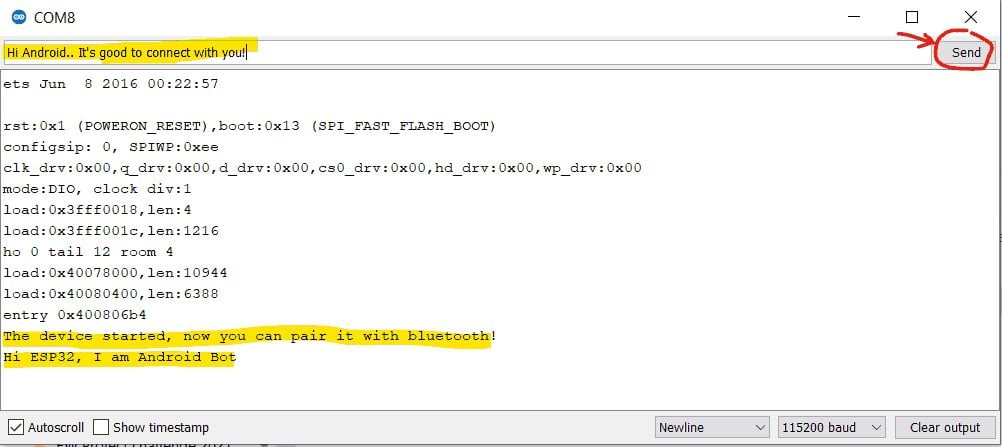
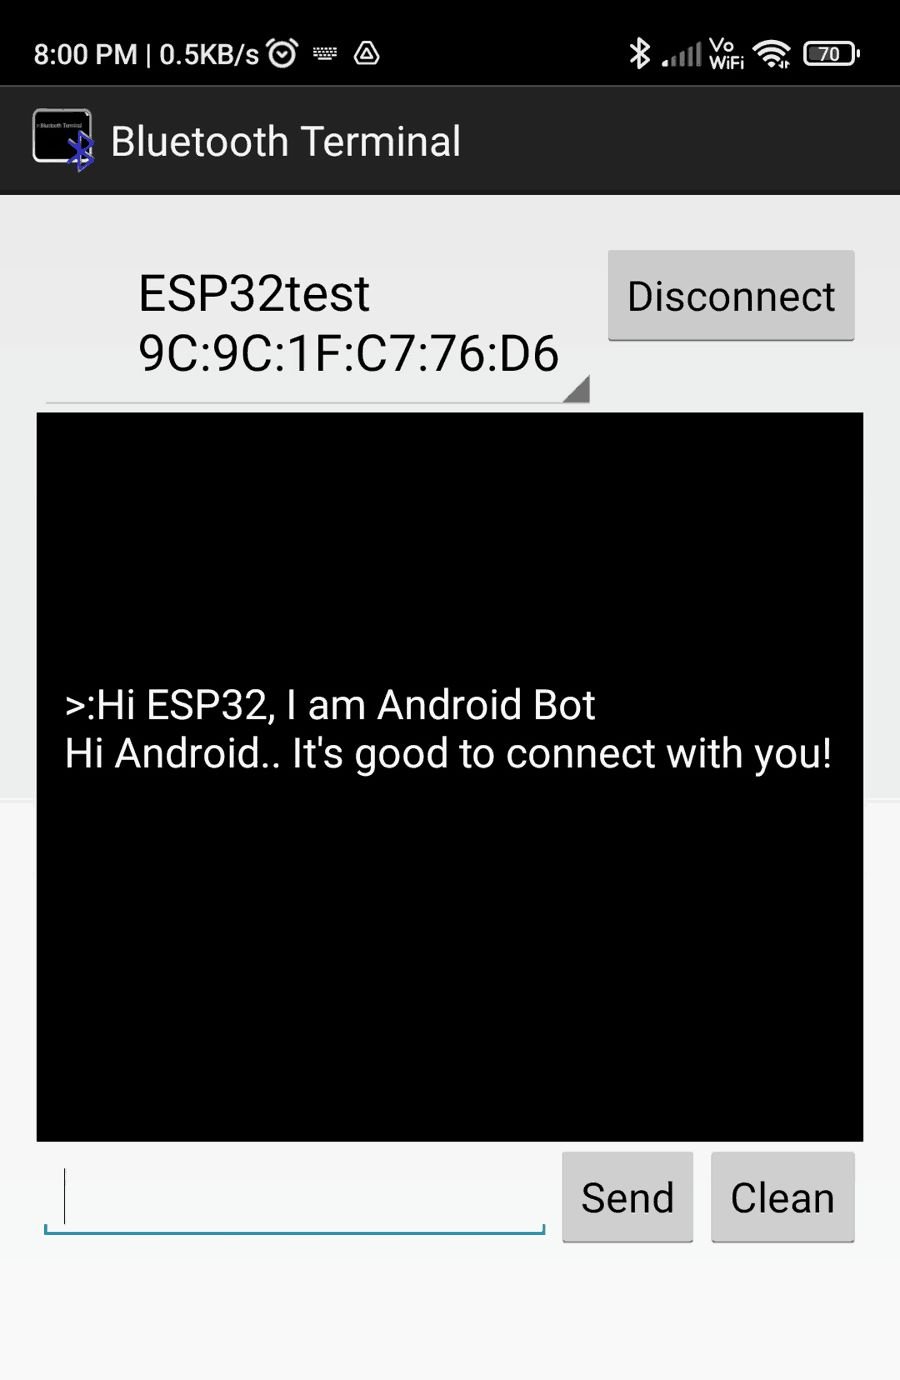
Screenshot as follow:
 After connecting with the ESP32test, we can type the string and send it to ESP32.
Also, we can send a string to our Smartphone via ESP32 Bluetooth.
After connecting with the ESP32test, we can type the string and send it to ESP32.
Also, we can send a string to our Smartphone via ESP32 Bluetooth.
Output on Serial Monitor
Bluetooth Terminal App Output
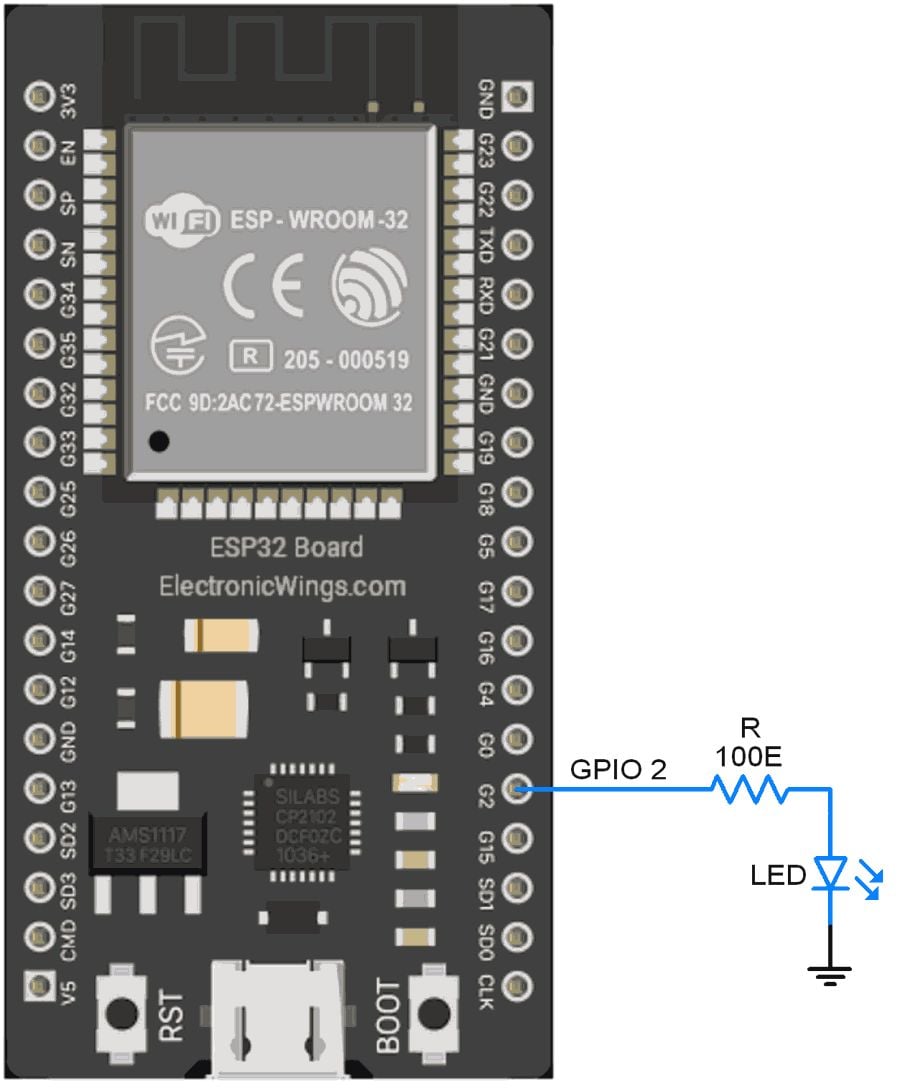
Control the LED using the ESP32 Bluetooth Application
Turning LED ON and OFF using ESP32 Bluetooth.
Interfacing diagram
 /*
Controlling LED/GPIO using Bluetooth
http:://www.electronicwings.com
*/
#include "BluetoothSerial.h"
const char LED= 2;
const char turnON ='a';
const char turnOFF ='b';
#if !defined(CONFIG_BT_ENABLED) || !defined(CONFIG_BLUEDROID_ENABLED)
#error Bluetooth is not enabled! Please run `make menuconfig` to and enable it
#endif
BluetoothSerial SerialBT;
void setup() {
Serial.begin(115200);
pinMode(LED, OUTPUT);
SerialBT.begin("ESP32test"); //Bluetooth device name
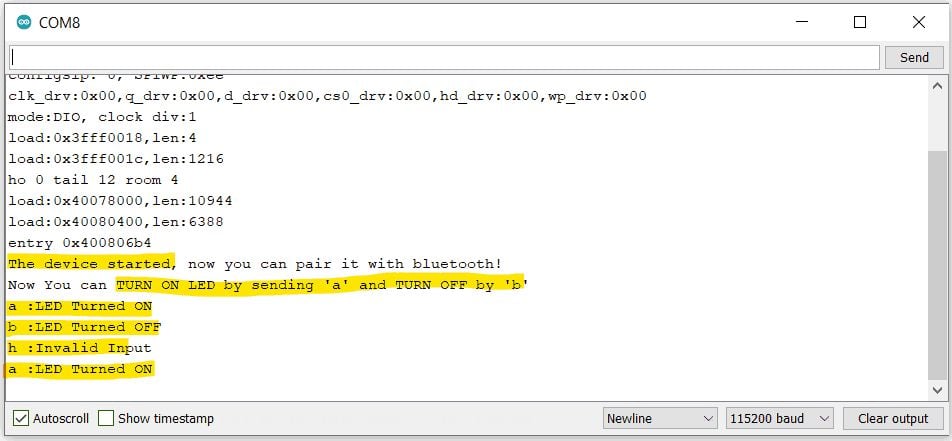
Serial.println("The device started, now you can pair it with bluetooth!");
Serial.println("Now You can TURN ON LED by sending 'a' and TURN OFF by 'b'");
}
void loop() {
char message;
if (SerialBT.available()) {
message=SerialBT.read();
Serial.write(message);
if(message==turnON){
digitalWrite(LED, HIGH); //Turn LED ON
Serial.println(" :LED Turned ON");
SerialBT.println("LED Turned ON");
}
else if(message==turnOFF){
digitalWrite(LED, LOW); //Turn LED Off
Serial.println(" :LED Turned OFF");
SerialBT.println("LED Turned OFF");
}
else{
Serial.println(" :Invalid Input");
SerialBT.println("Invalid Input");
}
}
delay(20);
}
/*
Controlling LED/GPIO using Bluetooth
http:://www.electronicwings.com
*/
#include "BluetoothSerial.h"
const char LED= 2;
const char turnON ='a';
const char turnOFF ='b';
#if !defined(CONFIG_BT_ENABLED) || !defined(CONFIG_BLUEDROID_ENABLED)
#error Bluetooth is not enabled! Please run `make menuconfig` to and enable it
#endif
BluetoothSerial SerialBT;
void setup() {
Serial.begin(115200);
pinMode(LED, OUTPUT);
SerialBT.begin("ESP32test"); //Bluetooth device name
Serial.println("The device started, now you can pair it with bluetooth!");
Serial.println("Now You can TURN ON LED by sending 'a' and TURN OFF by 'b'");
}
void loop() {
char message;
if (SerialBT.available()) {
message=SerialBT.read();
Serial.write(message);
if(message==turnON){
digitalWrite(LED, HIGH); //Turn LED ON
Serial.println(" :LED Turned ON");
SerialBT.println("LED Turned ON");
}
else if(message==turnOFF){
digitalWrite(LED, LOW); //Turn LED Off
Serial.println(" :LED Turned OFF");
SerialBT.println("LED Turned OFF");
}
else{
Serial.println(" :Invalid Input");
SerialBT.println("Invalid Input");
}
}
delay(20);
}
Output on Serial Monitor
Bluetooth Terminal App Output
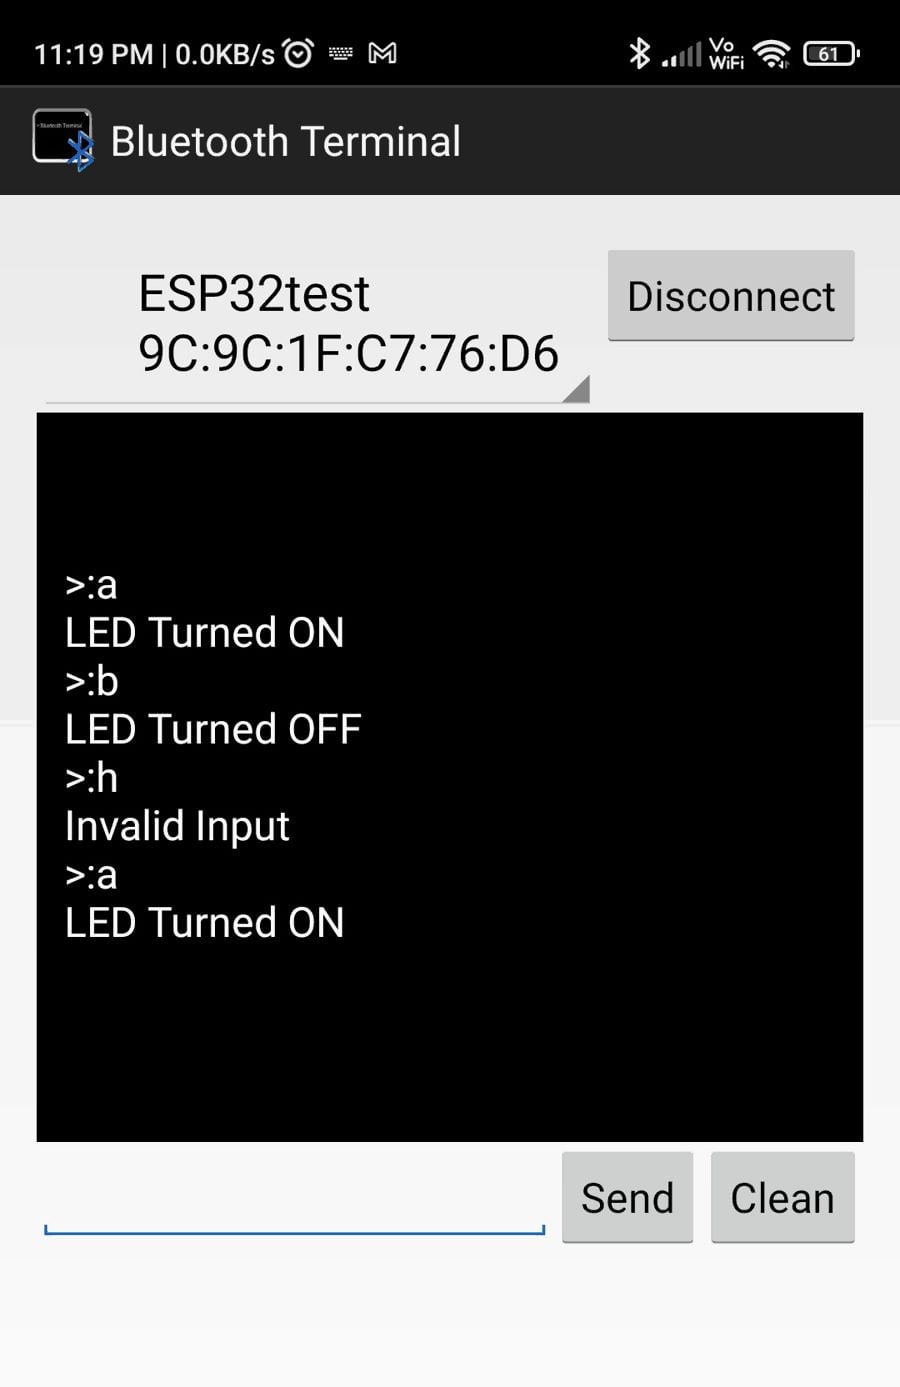
How this code Works
Once we turn ON the Bluetooth, the code scans for any data available on the Bluetooth serial.
if (SerialBT.available())
Then simply, if the character received is ‘a’, the Code will Turn ON the LED.
Also, it will send the action “LED Turned ON” to the Bluetooth device and computer terminal as well.
If the Character received is ‘b’, the Code will Turn OFF the LED.
If any other character is received, it will be considered invalid.